Hi Aki3,
Sorry you've had such a hard time with trying to get Luxrender up and running. I'd hoped it would have sorted out by now but I know how frustrating these things can be, the people here are really helpful and generous with there time and patient explanations.
I'm probably not the best qualified to explain this and I'm sure there are many others who could do a better job, but this is a sort of thank you for those who taken the time to help me, so please bear with me. I don't know if this is the correct way of installing LuxrenderDS but this is how I was able to get it successfully running on my 32bit Xp pro system.
• Hi Aki3, I saw your new post and I'm really glad that you were able to get the LuxRenderDS plugin going that's awesome, I hope that you have fun. And as you suggested I will put up what I prepared for those who are looking to install Tofusans LuxRenderDS plugin for the first time.
It's important to explain that Tofusan's LuxRenderDS is a plugin that allows Daz Studio 3 to talk to the LuxRender Render Engine. Daz Studio 3 is used to set up the scene, Tofusan's LuxRenderDS plugin is used to set up your lights and materials and then it translates all that into a language that luxRender can understand and sends that infomation to LuxRender. LuxRender in turn reconstructs that information about the scene and then Renders the Result. LuxRender also allows some realtime control over lighting while it rendering.
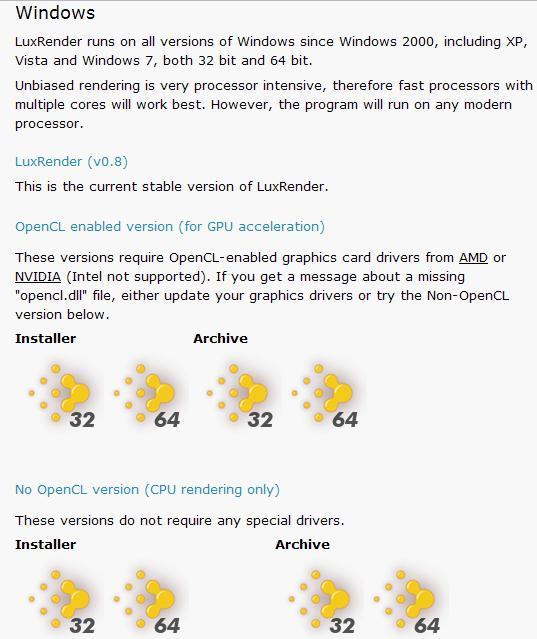
First of all you need to download and install Luxrender from http://www.luxrender.net/en_GB/standalone#windows You will need one of the installers (not the archives) which best fits your system specifications. If you have either Mac or Linux keep scrolling down and you will find an installer there. Install Luxrender, and allow it to install to your c:\ drive, if you choose to put it somewhere else, please remember the path as it will be needed later.
Next download the latest LuxrenderDS plugin from Tofusan's site
http://tofusan.cocolog-nifty.com/blog/download.html
.
The site is in Japanese, so you need to get google to translate it for you. Tofusan is the generous person who's continued hard work (in his own free time), makes this plugin available, giving the Daz Studio 3 community free access to the LuxRender render engine. Please check out the links to Tofusan's earlier versions of LuxRenderDS as they contain important tips and tricks for using other features in LuxRenderDS. And keep an eye on his download page as often new updates will be posted there before they appear in his main page.
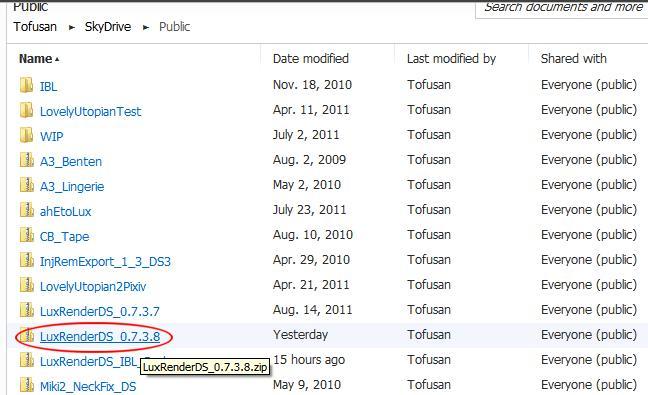
Scroll down until you see LuxRenderDS Plugin Version and click on the folder Icon.

This will take you to Tofusan's skydrive where his zips are housed, click the latest LuxrenderDS_ plugin version, and download.
Navigate to where you saved the LuxRenderDS plugin. Unzip the Plugin file into the Daz Studio3 Content folder.
If you installed Daz Studio3 to your C drive the
path may look something like this
C:\Program Files\DAZ 3D\DAZStudio3\content\
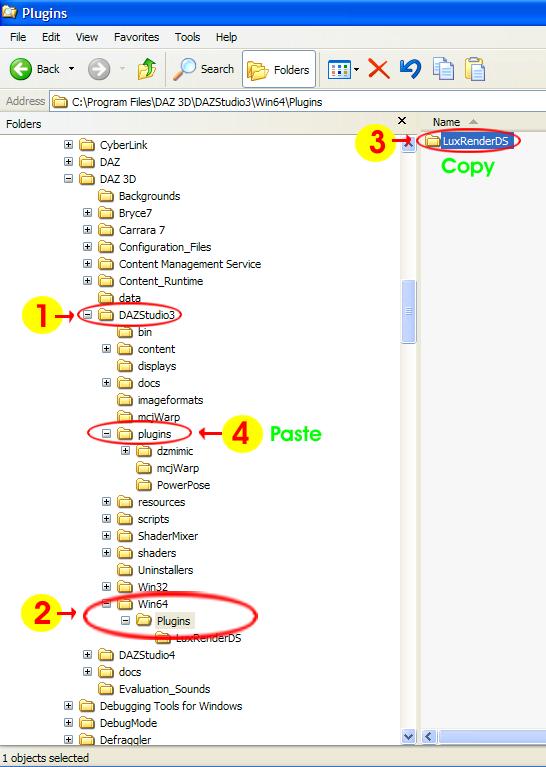
1. Navigate to your Daz Studio 3 folder
2. If you unzipped it to the right place you will now have two new folders called Win32 and Win64 in the DazStudio3 folder (there is also a ReadMe_EN.txt that you should have a good look at). Open either the Win32 folder if you have a 32bit system or the Win64 folder if you have a 64bit system.
3. Open up the Plugins folder and copy the LuxrenderDS folder
4. Paste the LuxrenderDS folder into the DazStudio3 plugins folder. The plugin is now installed. (:
Now open up Daz Studio3
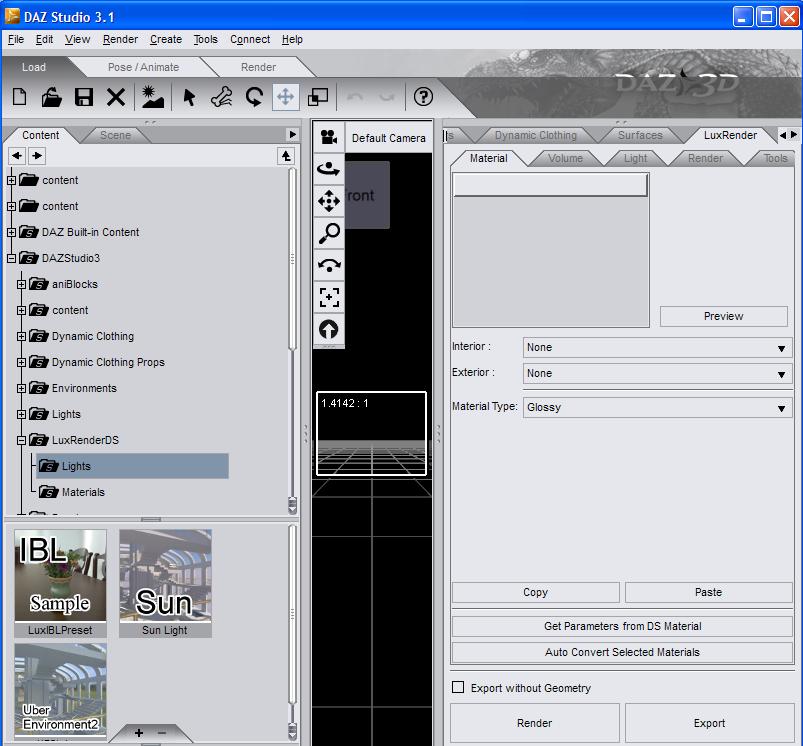
In DAZ Studio3 we need to go to the view Menu - Tabs and then click on LuxRender to open up the LuxRender Tab.
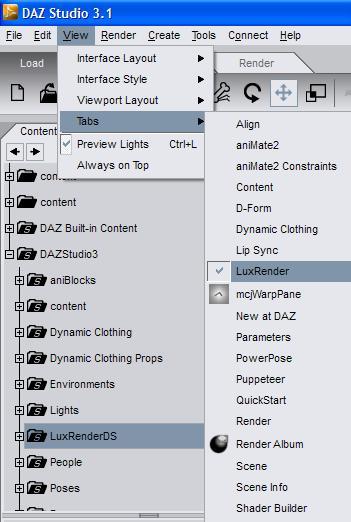
If everything went well it should open up the new Luxrender Tab, I docked mine on the right. I'm not sure how you have set up your folders, but in my setup, in the Content Tab on the left, in the DazStudio3 folder there is a new LuxrenderDS folder with LuxrenderDS Lights and Materials.
Now comes the fun bit ... This is just for a quick test, load in M4, then when DAZ is ready add a Sun light from your LuxRenderDS Lights folder by clicking on Sun Icon.
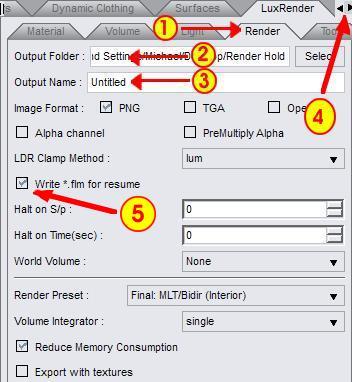
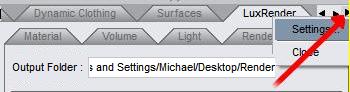
4. If you want to change the default folder LuxRender saves your files to, click on the far right arrow head on the LuxRender Tab (I'm not sure why but sometime you might see 2 and other times 3 arrow heads, might depend on the position of Tab?) it will give you two options, Settings and Close, choose Settings and change default output folder path to one of your choosing.
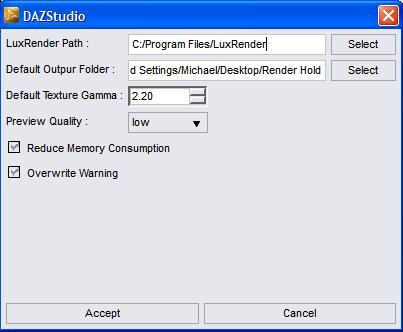
Important Note - While you are in Settings, make sure that the LuxRender path is pointing to where you installed Luxrender. If you you installed LuxRender to the c drive it will look something like this C:/Program Files/LuxRender but if you installed it somewhere else put that Path in.
Important Note — For those using a 32bit system make sure that the Reduced Memory Consumption is ticked. As the 32bit system is limited to the amount of ram that it can use, only 2gb. So keep that in mind if LuxRender keeps crashing while trying to render a scene.
Important Note — For those using a 32bit system set the Preview Quality to low (this is for the materials preview used in the Material tab, higher settings take forever)
For 64bit users, LuxRender is able to use as much ram as you can throw at it, enjoy. (:
When you are finished with settings press Accept.
5. Make sure that the Write *.flm for resume is ticked. You will need this to resume your render at a later time.
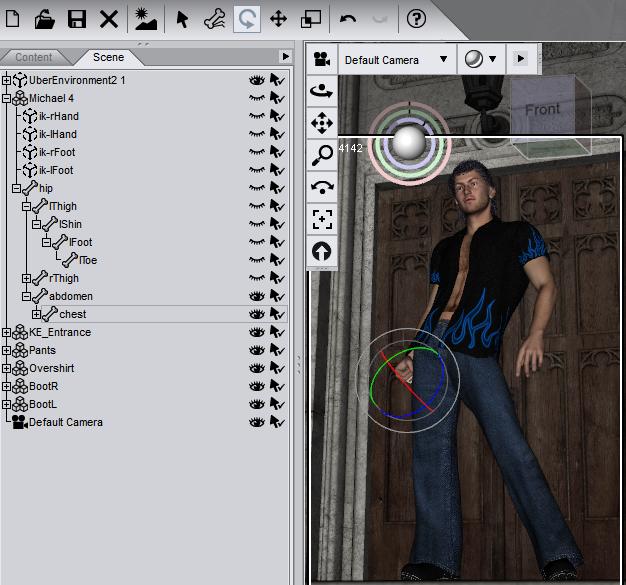
The Daz Studio scene below was impossible to render it kept crashing LuxRender due to the memory limitation. What I did to get around this was to hide anything that is not seen in the actual scene, including any objects outside the actual view of the camera.
In the scene below I turned off M4 hips, legs and feet as they were hidden under clothing, I even hid the upper and lower jaw and tongue as his mouth was closed. With the background model (Jack Tomalins - Keep Entrance) I turned off the walls, roof and lower parts of the stairs. I also reduce the number of lights I was using.
Another thing to watch is the Daz Studio Render settings in particular the “final output size”. This will have a big impact on the memory so keep an eye on it. So unfortunately for us 32bit users it a bit of a balancing act but still worth it.
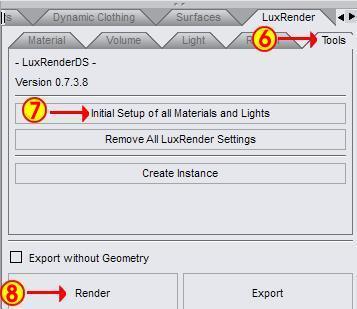
6. Click on the Tools tab
7. ***Important step make sure you always click on "Initial Setup of all Materials and Lights" button before you render your scene otherwise none of your objects will have any materials, and will come out all white. Its also Important for setting up your materials, but we won't get into that here. But when you are ready, have a look at the LuxRender Wiki http://www.luxrender.net/wiki/Main_Page .
8. LuxRender will render at what ever output size is set in your Daz Render setting! So check that before you render, for now set it to 600x800 and choose accept. Then back to the Luxrender Tab and Click on Render, DAZ will prepare the file and send it to LuxRender which should automatically open and start rendering your test scene. Give LuxRender a few seconds (especially if you are on the 32bit system) as it loads in your scene, you may get a black image then a pixelated one and it will continue to improve the longer you leave it.
This leads us to an important question that is often asked: “When is LuxRender finished rendering my Image?”
Well never really, it will just continue to bounce lights around until you tell it to stop. There's a lot of things that can influence the final render time, lighting, material setting, networking, amount of ram, number of Threads used (for those on multi core systems) and lets not forget whether you are on 32bit or 64bit.
So for some, they may feel that there image looks just right after 30min, while others will leave it rendering for two or three hours. I render a lot of images out 600x800 just to test lighting and materials. I'm normally happy after an hour or so.
Once I used my Intel dual core 32bit machine networked with a computer with the same specifications, to rendered an image that was 1600x1131, for something like 18 hours before I felt happy with it. I changed the lights slightly and rendered it again, and felt I got a better result after 12 hours. Yeah so it might take some experimentation to see what works in each situation!
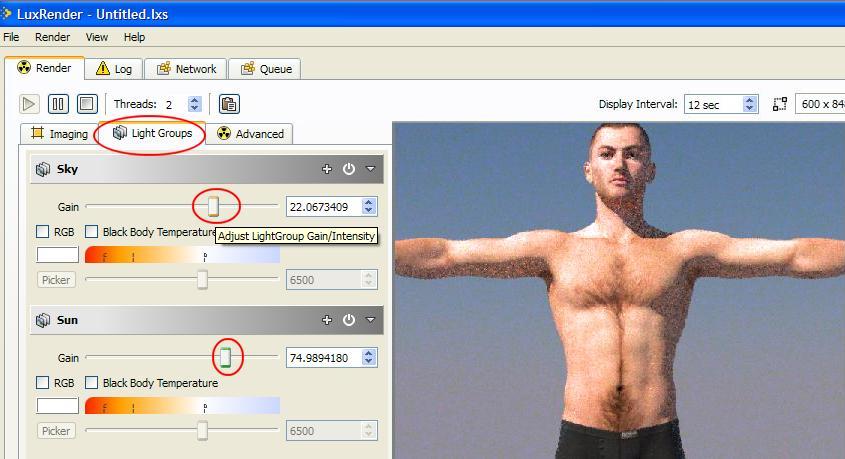
Click on the Light Groups tab, and play around with the Sky and Sun sliders. Wow I hear you saying but wait there's more . . .
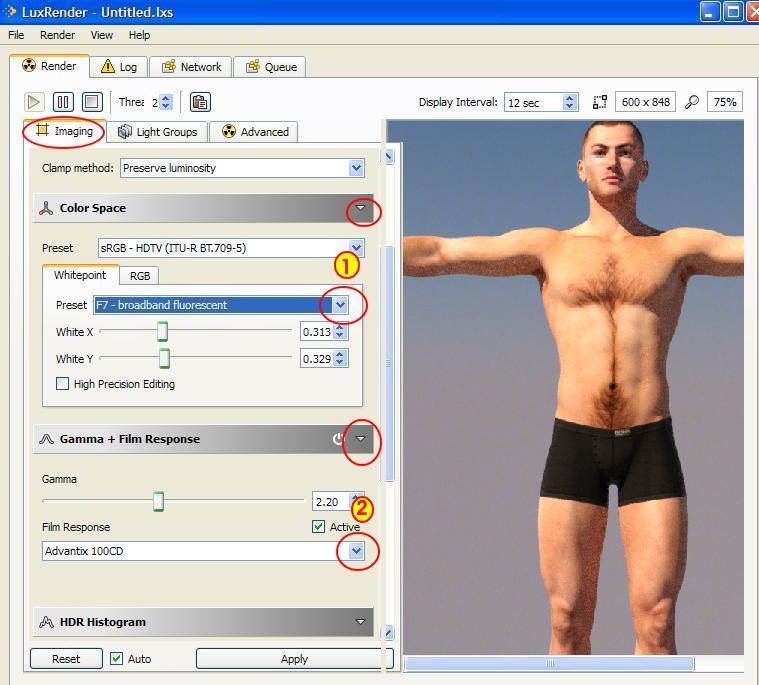
1. Click on the Colour Space arrow and Preset drop down arrow and pick a Light setting
2. Click on the Gamma + Film Response arrow and Film Response drop down arrow pick one that suits you tastes.
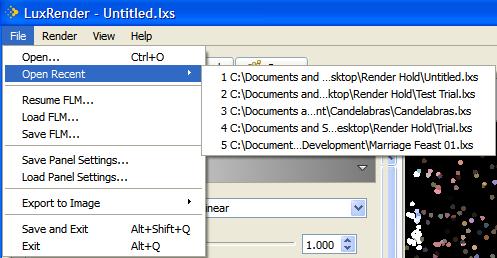
When you're finished, Save and Exit. If you want to resume your render just open up Luxrender (you don't have to reopen Daz Studio3 again), go to Open Recent and it should appear in the drop down list. If your file does not appear in the drop down list then click on Resume FLM, and then navigate to the folder you saved your Render to, and choose the “what ever you called the file.FLM”. You will also find your finished Render in that same folder, it should be a PNG unless you've changed it, back in the LuxRender Render Tab in Daz Studio3.
This tutorial barely scratches the surface of what Tofusan's plugin and LuxRender can do, I hope this gives you some idea of how to get started with LuxRender anyway. I hope you enjoy Tofusan's wonderful plugin.
Please if there is anything that is not clear, mistakes, important things left out or better ways of handling things in this tutorial please let me know and I will edit them as soon as I can.
michael.too ![]() gmail com
gmail com
All screen shots and programs used in this tutorial were taken from the following sites and programs —
In the past God spoke to our forefathers through the prophets at many times and in various ways, but in these last days he has spoken to us by his Son, whom he appointed heir of all things, and through whom he made the universe.